


Archives
April 2009
| |||||||||||||
Tom wanted a Korina Vector and a Korina Special identically finished and trimmed. The first step is always to select all the wood and make the best possible match. As you can see in this photo, the neck pieces are all cut from the same board. This not only makes sense from a cosmetic standpoint, but more importantly it allows the neck to function as a single unit. We use a method that I developed in 1980 called a "stressed neck" system, which is a way of opposing the grain of a three piece neck to increase stability. The center piece is a "neutral" member with its grain aligned in a quartersawn orientation. The outside pieces are cut from the same board, and are arranged in a mirror image positioning. This uses the natural tendency of the wood's movement to be counteracted and therefore balanced. The result is a stronger, more stable neck than a single piece, yet it retains the vibrational integrity of the single board. As a final detail, the "ears" on the side of the headstock are made from the exact same piece as the neck sides. This completes the entire unit with both a visual and sonic match. Check back to watch how the details are being handled, and an update on Jon Herington's guitar too. |
| ||||||||||||
April 22, 2009
|
| ||||||||||||
In this shot Mike is holding the cellulose up to the light to look for any "junk" that may have gotten into the material when it was being made. It's basically hardened lacquer, so sometimes foreign material contaminates it, but by looking through it he can discard a piece if there's a big fleck inside. It might not be visible on the surface, but the binding gets scraped down to thickness on the guitar which can reveal hidden problems. |
| ||||||||||||
His next move was to run the edge of the binding on the joiner to get the edge perfectly straight. This assures no gaps, which means no filler that has to be disguised with paint later. Mike is using a heat gun to soften the material and form it into the shape of the guitar. This is a time-consuming practice, but it means that the binding will be more inclined to stay put over the long haul instead of just relying on the adhesive to hold it in shape. |
| ||||||||||||
Meanwhile, Tom is cutting the binding rout on the headstock. |
He's already started the fingerboard and pocketed it for inlays. Jon wanted simple dot markers and a signature "Victory" inlay at the 12th position. | ||||||||||||
At this point the neck is placed on a rack for several weeks in order to allow it to stabilize and come to rest before we put the final carve on the neck. This means that whatever twisting is going to happen, does so before we radius the fingerboard. The result means no fret-job will be needed to get the frets level and straight. It won't be long now! |
| ||||||||||||
April 28, 2009
|
| ||||||||||||
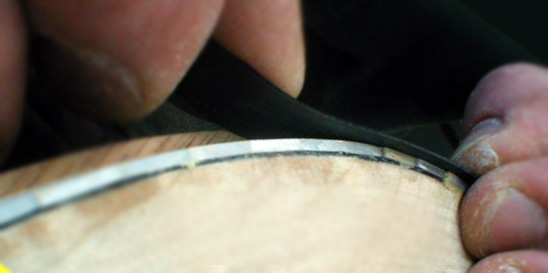
Using a cabinet scraper, Tom brings the binding flush with the mahogany back then continues on with sandpaper and block. He'll take it down and flow all the edges where the different angles meet so that it all works together visually. |
| ||||||||||||
Meanwhile, Dave has already radiused the fingerboard and inserted the frets using an arbor press, and has left me to file the fret ends down flush so that the binding can be applied. I like to do this before carving because there's more of a ledge to run the file against and less chance of damaging the edge. |
| ||||||||||||
Now it's time to bring the neck down to shape. While Jon was in our shop we used a contour gauge to record the shape of his favorite neck. Dave transfered that along with the measurements so that he could carve the Tally to the same specs. Note that Dave has measured and recorded the fret size as well. |
| ||||||||||||
|
| ||||||||||||
|
Now Dave will take a little off at a time with a cabinet scraper, measuring as he goes. He'll check it with the gauge constantly. Once he's done with the rough carve, Dave glues the binding on and finishes up the job. The most time consuming part is bringing the binding down flush with the face of the fingerboard and around each individual fret. Here, he's adjusting the truss rod and straightening the neck. Now it's just a matter of blending the edge where the wood meets the binding and sanding the headstock edges. We'll come back later to watch the neck fit. |
| ||||||||||||
April 29, 2009
|
| ||||||||||||
Using an xacto knife, Dave cuts the sharp "V" into the center of the binding channel at the top of the headstock. The rout was first made on the shaper but the radius of the cutter isn't small enough for the look we want. If you take a look at the pearl piece lying on the head plate you'll see what he's matching. When he's done it will be a perfect fit that won't require lots of filler. |
| ||||||||||||
|
The next step is to glue another piece of the .010" black on the outside of the pearl. This make a nice black border around the iridescent pearl. |
| ||||||||||||
After drying overnight, the neck and body are ready to get the last layer of ivoroid cellulose binding. |
Here is what it looks like on the fingerboard. | ||||||||||||
Check out those nice 45 degree miter joints Dave has made in the corners! Once again, the use of big pieces of pearl shows that we're not skimping. It takes about fourteen hours of work just to inlay and bind the neck, head and fingerboard alone. That's longer than it takes to make most production guitars completely! This is a realy nice shot of the nut end of the fingerboard. You can see the pearl channels in the fingerboard with the two-layer binding job on the outside. Also, notice the large curved pieces of shell that had to be cut to shape for the headstock flares on each side. Now all Dave has to do is take the binding down to the fretboard and we'll be ready to carve the neck. Oh, and yes, that is a lefty! |
| ||||||||||||