

Archives
July 2008
July 07, 2008
| |
Hi everyone, welcome back! After a nice three-day break for our nation's birthday, we're back at it again. A few posts ago we took a look at Mike prepping a Monaco guitar for abalone purfling. He's had a chance to cut and insert the shell strips around the guitar's perimeter, and is now making the miter cut at the cutaway. He glues and inserts the last piece of abalone then tapes it down to dry. When the adhesive has set up he can go ahead and mark the point where the miter will happen. |
|
Then, after laminating the two black strips of cellulose binding to the last piece of abalone shell, Mike cuts the matching angle. |
Here he is doing a dry fit test of the parts before gluing the last piece into place. |
On the next bench, Tom is doing much the same thing to the neck. Here, he scribes the binding channel with an Xacto knife. This is to eliminate any chance of tear-out when he uses the table shaper to rout the channel. |
|
This is a clever little precaution he takes—it's necessary because the way we do our paint leaves no margin for error. We run our color coats up to, but not over the binding blend line. The practice of going past the line with the paint allows mass produced guitars to use wood putty to fill any of the tear out or gaps, but we don't like the way that looks. We'll check back to see how this one turns out later. |
|
July 09, 2008
| |
At this point in the build, Mike and I were talking about the positioning of the controls on the body of Glenn Tipton's guitar, and we needed some clarification from the client. Glenn's original plan was for both a volume and a tone control, along with a three-way toggle. The last drawing we had showed only a single volume and a toggle, so we had to make a decision. Rather than guess, I got on the cell and called Glenn on his. Sure enough, the last drawing was correct, so we could proceed with one control hole. I rang off with Glenn and we marked the locations immediately. |
|
A few hours later, Mike has cut the neck pocket and fitted the neck to the body of the guitar. He's added the bevels on the body, and now it's time to do the neck blending. The first step is to draw out the blend line on the instrument. The idea here is to provide good hand access, retain the maximum amount of joint for good energy transfer and create a pleasing visual transition. |
|
After Mike and I take a couple swipes at it we get a good line, so it's time to park the guitar in a vise and get after it with a pneumatic drum sander. The grit is very coarse, so Mike takes it easy, just hogging off the major real estate. In this photo you can see the wood flying off the sander past Mike's shirt—always wear eye protection! |
|
After the sander, Mike does the final smoothing with a file and then with sandpaper. After about an hour, it's looking good. Glenn was stoked about the progress, and said that he was on his way to a photo shoot with his vintage Hamer Phantom GT. At this rate, the guitar will be in the paint booth soon. We'll come back to this project then. |
|
July 14, 2008
| |
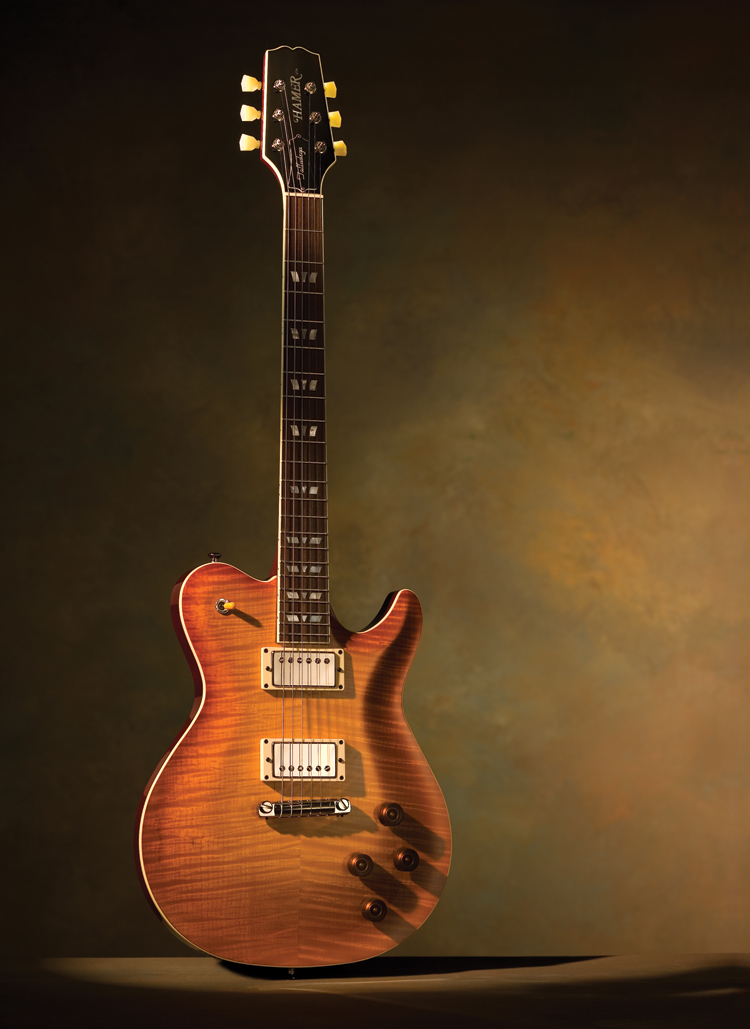
Finally, after three years of waiting in the wings, the Talladega Pro guitars are moving through the shop. The original Tally concept took a turn early on, and morphed into the guitar that we unveiled at the 2007 winter NAMM show. That guitar (known as the Talladega) has been in demand and has carved its own niche in the marketplace as well as the history of Hamer as a uniquely conceived and well-executed guitar. So now, after the Talladega has established its own identity, it is time to meet the original concept, the Talladega Pro. |
|
|
This version is distinctly different in ways that are both easily noticeable and subtle as well. The most obvious changes are the addition of two more controls and the use of a toggle switch on the upper side. Although the overall dimensions have remained the same, the body is thicker to concentrate more mass near the bridge area. This, coupled to a one-piece wraparound bridge gives the Pro a deep, solid fundamental. Once again we worked with Seymour to match the humbuckers to the guitar. They're lower output, with plenty of articulate highs, just like the original PAFs heard on those classic recordings by Peter Green, Clapton, Kossoff and Bloomfield. I wanted this guitar to be a humbucker-powered tone machine for players who play 25.5" scale guitars, so the scale remains the same as the original Tally, as does the comfy (and familiar) "V" shape on the neck. Sorry for the tease, but I'm still working on the "Road to Talladega Part 2" story—that will go into plenty of detail for all you spec-freaks and inside-story buffs out there. Until then, here's another look.
|
Talladega PRO Specifications Body: Ivoroid Bound Mahogany Top: hand Carved Figured Maple Neck: Ivoroid Bound 3 Piece Stressed Honduras Mahogany Fingerboard: Rosewood Bridge: TonePros Aluminum Wrap-Around Scale Length: 25 1/2" Fret Dimensions: Hamer Wide Oval: .100" x .050" Neck Shape / Thickness: '56 V Shape, 1.680" at Nut |
|
Inlays 9 Victory (genuine pearl)
|
|